Arrow 1.1.4 is released with Kotlin 1.7.22, and Arrow 1.1.5 is released with Kotlin 1.8.0. If you’re using the Arrow Optics KSP plugin with Kotlin 1.7.22, you should prefer 1.1.4 with Google KSP version 1.7.22-1.0.8.
If you’re already on Kotlin 1.8.0, or not using KSP, then you should prefer Arrow 1.1.5.
After discussions with the Arrow community and users, we have decided to deprecate a number of methods in the Either
API. This decision was made in order to make using Either
more Kotlin idiomatic and align with our goals for the 2.0.0 release.
In previous versions of Arrow, the API for working with Either
included a number of methods that were not idiomatic to Kotlin and did not align with the conventions used by the Kotlin Standard Library. As a result, these methods were often confusing to users and made the API more difficult to use.
This change will not reduce the overall size of the API in this release, but will lay the groundwork for further reductions in 2.0.0. We believe that this change will make it easier for users to work with Either
and will improve the overall user experience. You can find the documentation and discussion in the Either Deprecation PR on the Arrow project.
These deprecations are all marked with the ReplaceWith
mechanism of the Kotlin IDEA plugin to provide an easy way to migrate to the new APIs. If you encounter anything that hinders you from migrating, or have any other feedback, please open an issue on the official Arrow repository.
This release of Arrow Fx Coroutines includes the backport of the Resource
DSL, which was planned in preparation for 2.0.0, as well as two concurrency primitives: CountDownLatch
and CyclicBarrier
.
The Resource
DSL offers a more idiomatic way of reasoning about resource safety in Kotlin. Simon Vergauwen gave a talk about this at the Advanced Kotlin Dev Day, and code leveraging the new Resource
DSL is available in our example Ktor functional microservice.
CountDownLatch
is a synchronization tool that allows one or more coroutines to suspend until a set of operations has been completed. This can be useful for coordinating the actions of multiple coroutines, ensuring that they are executed in the correct order.
CyclicBarrier
is similar to CountDownLatch
, but it allows coroutines to wait for each other to reach a certain point in their execution before resuming. This can be useful for coordinating the actions of multiple coroutines that need to perform a complex operation together.
With the addition of these two primitives, Arrow Fx Coroutines provides even more powerful tools for working with concurrent code. We encourage all users to upgrade to the latest version and take advantage of these new features.
In the coming weeks and months, Arrow will be preparing itself further for its 2.0.0 release. When Kotlin 1.8.0 is released, we’ll make a final 1.1.x release with it.
After that, the 1.2.x series is planned, introducing more backports and deprecations to provide a graceful migration towards 2.x.x. Migration scripts will be provided on a best-effort basis, which should be able to handle 99% of the work to migrate to these new backports in combination with the official ReplaceWith
mechanism of the Kotlin IDEA plugin.
We the functional team at Xebia are great fans of Kotlin, exploring the many possibilities it brings to the back-end scene. We’re proud maintainers of Arrow, a set of companion libraries to Kotlin’s standard library, coroutines, and compiler; and provide Kotlin training to become an expert Kotliner. If you’re interested in talking to us, you can use our contact form, or join us on the Kotlin Slack.
]]>In this episode of the Let’s Talk About Scala 3 series, Adrien Piquerez shows you how to debug a Scala 3 application in VS Code. Debugging a small multi-threaded web-server program is done to show how to start the debugger, walking through the code step by step, switching between threads, inspecting the runtime values, and more.
Speaker:
Adrien Piquerez - Software Engineer - Scala Center
Let’s talk about Scala 3
“Let’s talk about Scala 3” is a series of instructional and informational videos produced by the 47 Degrees Academy and the Scala Center.
]]>If you weren’t able to attend the conference, or if you missed any of the great talks, you’re in luck. Video recordings of all the ScalaCon 2022 presentations are now available for on-demand viewing!
You now have free access to all of the presentations from ScalaCon 2022, including the opening keynote that was delivered live and in-person in London by Scala’s lead designer Martin Odersky.
ScalaCon is a virtual conference designed to bring the Scala community closer together. It’s a collaborative project brought to you by the folks behind Scala eXchange and Scala Days. Visit the ScalaCon website for more information about this community event.
Follow ScalaCon on Twitter for the latest news and updates about ScalaCon.
]]>DEV: 127.0.0.1:8080
ACC: 192.168.0.105:8085
PROD: 12.14.16.18:89127
Severs typically also need to integrate with other services such as a databases, distributed message systems like Kafka, caches like Redis, or other microservices. These external services also run at different network coordinates and credentials based on the environment.
For example, TestContainers, docker-compose, or a cloud provider. These could be called TEST, DEV and ACC & PROD environments respectively.
Commonly used techniques for configuring applications is to either use data class
to model the environment configuration in a typed way and manually configuring frameworks, or letting frameworks automatically read configuration.
When writing your own typed environment configuration model, you can either load the config programmatically, or use formatted files with a library to convert the files into a typed model.
Let’s explore both options.
First, let’s look at how we can manually configure our environment in Kotlin with a typed domain model, also used inside 47 Degrees Github Alert Project. At 47 Degrees, soon to be Xebia Functional, we like using type-safe pragmatic solutions, and with plain Kotlin, we can get pretty far.
The Github Alert Project relies on Postgres, so let’s see how we can model both our http configuration, and database configuration.
import java.lang.System.getenv
data class Env(val http: Http = Http(), val postgres: Postgres = Postgres())
data class Http(
val host: String = getenv("HOST") ?: "0.0.0.0",
val port: Int = getenv("PORT")?.toIntOrNull() ?: 8080,
)
data class Postgres(
val url: String = getenv("POSTGRES_URL") ?: "jdbc:postgresql://localhost:5432/databasename",
val username: String = getenv("POSTGRES_USER") ?: "test",
val password: String = getenv("POSTGRES_PASSWORD") ?: "test",
)
In the example above, our typed Env
type has a couple of trade-offs:
It directly initializes the values in the constructor, and ignores the fact that System.getenv
is a side-effect. We consider this non-problematic since we want to fail-fast when the configuration is not available but it could easily be extracted from the constructor, and we’ll see below how to do so, and how to evolve this pattern further.
This technique relies on System.getenv
, or defaults to a single value. So we only encode two different flavors; in testing we rely on (TestContainer) -> Postgres
to build our Env.Postgres
value. This is all possible since we’re working with simple data classes.
There are two things we’ve ignored in the previous section which are side effects and error tracking. System.getenv
is already a side effect, but wrapping it inside suspend
doesn’t offer us a lot of benefit.
If a project requires accessing a remote config, feature flags, or reading configuration from disk, then suspend
might offer more benefits. For example, it could read remote configs in parallel.
suspend fun remoteEnv(): Env =
parZip({ remoteHttp() }, { remotePostgres() }) { http, postgres -> Env(http, postgres) }
When loading configurations, you might want to know which properties were missing before crashing the application. This can be useful for debugging; a logger could then list all the missing properties with a clear message.
import java.lang.System.getenv
fun env(name: String) : ValidatedNel<String, String> =
getenv(name)?.valid() ?: "\"$name\" configuration missing".invalidNel()
fun <A : Any> env(name: String, transform: (String) -> A?) : ValidatedNel<String, A> =
env(name).andThen { transform(it)?.valid() ?: "\"$name\" configuration found with $it".invalidNel() }
fun http(): ValidatedNel<String, Http> =
env("HOST").zip(env("PORT", String::toIntOrNull), ::Http)
fun postgres(): ValidatedNel<String, Postgres> =
env("POSTGRES_URL").zip(env("POSTGRES_USER"), env("POSTGRES_PASSWORD"), ::Postgres)
fun env(): ValidatedNel<String, Env> =
http().zip(postgres(), ::Env)
fun ValidatedNel<String, Env>.getOrThrow(): Env =
fold({ errors ->
val message = errors.joinToString(
prefix = "Environment failed to load:\n",
separator = "\n"
)
throw RuntimeException(message)
}) { it }
fun main(): Unit {
env().getOrThrow()
}
When we run the above example without any environment variables available, we will see the following output in the console:
Exception in thread "main" java.lang.RuntimeException: Environment failed to load:
"HOST" configuration missing
"PORT" configuration missing
"POSTGRES_URL" configuration missing
"POSTGRES_USER" configuration missing
"POSTGRES_PASSWORD" configuration missing
at MainKt.getOrThrow(main.kt:..)
This clearly shows us what is going wrong with the environment, and which configurations we are missing. Arrow naturally composes with suspend
, and thus this gives us all powers we typically look for when building typed configurations.
Perhaps the most common approach on JVM is to use configuration files inside the resource
folder, and letting the framework read it, or use a library specifically for decoding configuration files.
In the example below, we’re going to use the Hocon format by Lightbend, a popular format for configuring servers, in combination with Hoplite to automatically read & decode the hocon file into our own data class domain.
Let’s take the same example from before, but adjust it to use Hocon.
data class Env(val http: Http, val postgres: Postgres)
data class Http(val host: String, val port: Int)
data class Postgres(val url: String, val username: String, val password: String)
fun main() {
val env = ConfigLoader().loadConfigOrThrow<Env>("/application.conf")
}
With configuration files, the project needs to split the configuration between at least two files: The first one defining our data classes in our main
code (seen in the snippet above); the second one defining our actual configuration in our main/resources/application.conf
directory, like the snippet below. As you can see below, it requires learning about a new format like HOCON or any other formats that might be used.
http {
host = "127.0.0.1"
host = ${?HOST}
port = 8080
port = ${?PORT}
}
postgres {
url = "jdbc:postgresql://localhost:5432/databasename"
url = ${?POSTGRES_URL}
username = "test"
username = ${?POSTGRES_USER}
password = "test"
password = ${?POSTGRES_PASSWORD}
}
Since the project still needs to define multiple environments, such as TEST, DEV, and ACC & PROD, we still need a way to define default values and point to environment variables. HOCON uses a similar approach as was used above, where the values are defined through optional environment variables while providing default values.
With HOCON, it reads the other way around. The first example above used the elvis operator ?:
to configure getenv("XXX") ?: "default_value"
, whereas HOCON defines a value url = default-value
and it then attempts to override with an optional ${?XXX}
environment variable.
url = "jdbc:postgresql://localhost:5432/databasename"
url = ${?POSTGRES_URL}
A library, or the framework, can read these specific configuration by providing a path to them /application-prod.conf
, /application-dev.conf
, or /application-acc.conf
, etc.
val env = ConfigLoader().loadConfigOrThrow<Env>("/application.conf")
In the case below, none of the optional environment variables were present.
Env(http=Http(host=127.0.0.1, port=8080), postgres=Postgres(url=jdbc:postgresql://localhost:5432/alerts, username=test, password=test))
In this example, we used "com.sksamuel.hoplite:hoplite-hocon:2.5.2"
, but Hoplite also has support for yml
, json
, toml
, and Java Properties
.
Alternatively, you can have Ktor or Spring read in the application configuration, and they offer some utilities to access non-framework configuration values. See Ktor documentation for examples. This however takes away the ability to have typed domain models as used above, and takes away quite a bit of flexibility to setup services that are not related to the framework.
When using plain Kotlin, we get the most flexibility, and this solution will work on any Kotlin platform. Since Native, JVM, and NodeJS give you easy access to environment variables, it can be combined with any other technique such as Structured Concurrency, and validation as you see fit. This approach requires writing more Kotlin code, and couples the configurations inside the Kotlin codebase.
File based configuration, with excellent libraries such as Hoplite, offer a great solution. But, in comparing the two, we found that it typically requires a similar amount of code whilst also introducing more formats. This solutions is most common on the JVM, and often doesn’t work for Kotlin MPP. This approach requires writing less Kotlin code, and allows you to swap configuration simply by swapping a file in the resources before building the JAR.
Both are great solutions with their own pros and cons. Happy coding!
We’re great fans of Kotlin at 47 Degrees (soon to be Xebia Functional), exploring the many possibilities it brings to the back-end scene. We’re proud maintainers of Arrow, a set of companion libraries to Kotlin’s standard library, coroutines, and compiler; and provide Kotlin training to become an expert Kotliner. If you’re interested in talking to us, you can use our contact form, or join us on the Kotlin Slack.
]]>Over the last few months, we’ve been meeting more of the wider Xebia team and setting the groundwork for collaboration and future projects.
Now, we’re happy to inform people that the next step in our journey is transitioning our company name and brand to Xebia Functional.
At the beginning of the new year, you’ll be able to find us living under the Xebia.com domain serving as the Authority branch of technologies and digital transformations within the safer software, formal verification, and functional programming scope.
So, what changes will you start seeing now?
We’ll be rolling out updates to our social handles and sales and marketing collateral and adapting our look and feel as we merge with the greater Xebia group. You’ll start seeing us appear as Xebia Functional at upcoming events, both online and in-person, and representing our new name within the greater tech community.
As we mentioned in our partnership announcement, we’re still the same team offering the same high-caliber services and expertise to our existing and future clients. Under the Xebia brand, we’ll be able to offer businesses a one-stop, full-stack shop for digital business transformation.
We’ll be keeping everyone updated on our progress as we go. Here’s to a very exciting 2023!
We’ve got a variety of open roles focused on Scala, Kotlin, Java, and DevOps: Work at Xebia Functional
Xebia is an IT Consultancy and Software Development Company that has been creating digital leaders across the globe since 2001. With offices on every continent, we help the top 250 companies worldwide embrace innovation, adopt the latest technologies, and implement the most successful business models. To meet every digital demand, Xebia is organized into multiple service lines. These are teams with in-deptht knowledge and experience in Agile, DevOps, Data & AI, Cloud, Software Development, Security, Quality Assurance, Low Code, and Microsoft Solutions. In addition to high-quality consulting and state-of-the-art software, Xebia Academy offers the training that modern companies need to work better, smarter, and faster. Today, Xebia continues to expand through a buy-and-build strategy. We partner with leading IT companies to gain a greater foothold in the digital space.
]]>In this episode of the Let’s Talk About Scala 3 series, Sébastien Doeraene shows how to get started with Scala.js, Laminar, and ScalablyTyped. He demonstrates how to build a live-editable bar chart, and you’ll learn the following skills in the process:
Speaker:
Sébastien Doeraene - Technical Director - Scala Center
Let’s talk about Scala 3
“Let’s talk about Scala 3” is a series of instructional and informational videos produced by the 47 Degrees Academy and the Scala Center.
]]>kotest-assertions-arrow
with combinators for Arrow Fx.
Thanks for all the feedback and contributions!
The Gradle setup is fairly straightforward:
dependencies {
implementation("io.arrow-kt:arrow-fx-coroutines:arrow_version") // assuming this is not in the project classpath
testImplementation("io.kotest.extensions:kotest-assertions-arrow-fx-coroutines:1.3.0")
}
It applies similarly in Maven:
<dependency>
<groupId>io.kotest.extensions</groupId>
<artifactId>kotest-assertions-arrow-fx-coroutines-jvm</artifactId>
<version>1.3.0</version>
<scope>test</scope>
</dependency>
Try out our various templates for a fast and easy set-up.
Combinators for Resource simplify integration tests or testing various kinds of dependencies.
Including smart-casted assertions:
class ResourceSpec : StringSpec({
"Int Resources are the same" {
checkAll(Arb.int()) { n ->
val b: Int = Resource.just(n).shouldBeResource(n)
b shouldBe n
}
}
})
or comparing different Resource results like here:
"resource equality" {
checkAll(Arb.int()) { n ->
val a = Resource({ n }, { _, _ -> Unit })
val b = Resource({ n }, { nn, _ -> println("release $nn") })
a.shouldBeResource(b) shouldBe n
}
}
A key extension function to consume Resources safely - without Resource violations - in any Kotest [Spec] is Resource#extension
.
See an example of Hikari and Exposed below.
fun hikari(config: HikariConfig): Resource<DataSource> =
Resource.fromCloseable { HikariDataSource(config) }
fun database(ds: DataSource): Resource<Database> =
Resource(
acquire = { Database.connect(ds) },
release = { db, _: ExitCase -> closeAndUnregister(db) }
)
class DependencyGraph(val database: Database)
fun dependencies(config: HikariConfig): Resource<DependencyGraph> =
resource {
val ds = hikari(config).bind()
val db = database(ds).bind()
DependencyGraph(db)
}
In a Kotest [Spec], we can safely consume the database with Kotest [MountableExtension] using [install]:
import io.kotest.core.extensions.install
import io.kotest.assertions.arrow.fx.coroutines.extension
class DatabaseSpec : StringSpec({
val config = HikariConfig().apply {
// add config settings
}
val dependencyGraph: DependencyGraph = install(dependencies(config).extension())
// follow up with tests
"test" {
val database: Database = dependencyGraph.get().database
}
})
There is an option to register [Resource] on a Project wide configuration with [ProjectResource] which interoperates with Kotest [Extension].
import io.kotest.core.config.AbstractProjectConfig
import io.kotest.assertions.arrow.fx.coroutines.ProjectResource
object ProjectConfig: AbstractProjectConfig() {
val config = HikariConfig().apply {
// add config settings
}
val dependencyGraph: ProjectResource<DependencyGraph> =
ProjectResource(dependencies(config))
override fun extensions(): List<Extension> = listOf(dependencyGraph)
}
class MySpec : StringSpec({
"test project wide database" {
val database: Database = ProjectConfig.dependencyGraph.get().database
}
})
The library contains smart-casted operators for ExitCase like ExitCase#shouldBeCompleted
, among others:
import kotlinx.coroutines.CompletableDeferred
import io.kotest.assertions.arrow.fx.coroutines.resource
import io.kotest.assertions.arrow.fx.coroutines.shouldBeCompleted
import arrow.fx.coroutines.ExitCase
import arrow.core.identity
class ExitCaseSpec: StringSpec({
"value resource is released with Completed" {
checkAll(Arb.int()) { n: Int ->
val completable = CompletableDeferred<ExitCase>()
val nn: Int = Resource({ n }, { _, ex -> completable.complete(ex) }).use(::identity)
nn shouldBe n
completable.await().shouldBeCompleted()
}
}
"shouldBeCancelled(e)" {
checkAll(Arb.string().map { CancellationException(it) }) { e ->
ExitCase.Cancelled(e).shouldBeCancelled(e)
}
}
})
There will be a follow-up blog post with more in-depth content on using Kotest Arrow extension libraries.
]]>SQLDelight and Flyway are two of our best tools for dealing with databases in Kotlin. The former allows us to generate typesafe Kotlin methods from SQL schemas and operations, and the latter helps with the tedious work of applying migrations to different databases. In this post, we discuss how to make them work together in order to have a full workflow from start to end; something that is not entirely obvious looking only at the documentation of both projects. If you’re interested in SQLDelight, we’ve talked about the different options for database persistence available in Kotlin previously in this blog.
SQLDelight is packaged as a Gradle plug-in. The most basic configuration specifies a name for the class that represents a connection to the database, the package where this class and all the rest should live, and optionally the SQL dialect used in the rest of the files. In the code block below, we show how to declare the dependency on the plug-in in the build.gradle.kts
file, alongside a single database named Database
living in com.fortyseven.sqldelight.example
and using the latest SQLite dialect. Note that we’re assuming here that you’re using an SQLDelight version on the 2.x series, which is still in development at the moment of writing, but works fine for most applications.
plugins {
kotlin("jvm") version "$kotlinVersion" // or multiplatform
// maybe others like serialization
id("app.cash.sqldelight") version "$sqlDelightVersion"
}
sqldelight {
database("Database") {
packageName = "com.fortyseven.sqldelight.example"
dialect("app.cash.sqldelight:sqlite-3-38-dialect:$sqlDelightVersion")
}
}
Once configured, SQLDelight looks for .sq
files in the sqldelight
folder under your sources path. With the options defined above, and assuming a Kotlin/JVM layout, those files should live in src/main/sqdelight/com/fortyseven/sqldelight/example
. Here’s an example of a very simple Person.sq
file that declares a person
table, and a newPersonInTown
operation to insert new people in the table. Apart from a couple of SQLDelight-isms, this file is plain SQL.
CREATE TABLE person (
id INTEGER AS PersonId PRIMARY KEY,
age INTEGER,
name TEXT NOT NULL
);
newPersonInTown:
INSERT INTO person (age, name)
VALUES (:newAge, :newName)
RETURNING id;
More concretely, there are two elements that prevent this file from being directly consumed by a SQL database server. The first one is the use of AS PersonId
in the declaration of the id
column, which instructs SQLDelight to (de)serialize the values of that field to and from the PersonId
type, instead of the default Long
. The second one is giving a name newPersonInTown:
to the parametrized insertion below. From this file, SQLDelight generates a Database
class to access the database, a Person
data class representing values of the table, and a newPersonInTown
method that performs the insertion. Since the goal of this post is strictly migrations, we redirect the interested reader to our post on persistence in Kotlin, and the SQLDelight docs.
The main idea after migrations is that, every time that the schema changes, instead of modifying the single .sq
file, you write a new migration file that explains the changes to be done to the schema to bring it up-to-date. It’s a bit like “control versioning” for database schemas: you start with an initial schema, and then write “diffs”; if you want to get the final schema, you simply execute the migration files in sequence.
SQLDelight supports migrations natively, but it requires a bit of preparation. First of all, we should separate the files describing the schema – the CREATE TABLE
above – from the operations and queries – like newPersonInTown
. The current schema is going to become our initial schema, which we save as the V1.sqm
file (note that the extension has an additional m
); the newPersonInTown
operation stays in Person.sq
.
CREATE TABLE person (
id INTEGER AS PersonId PRIMARY KEY,
age INTEGER,
name TEXT NOT NULL
);
Any change to this schema is described in new migration files with consecutive numbering. For example, we may want to add a new column to this table to record the birth year of each person, so we create a new file V2.sqm
with the following content.
ALTER TABLE person ADD COLUMN year INTEGER;
We need to instruct SQLDelight to obtain the complete schema from the combination of all those migration files. For this, we need to slightly tweak the Gradle file, enabling the deriveSchemaFromMigrations
option.
sqldelight {
database("Database") {
...
deriveSchemaFromMigrations = true
}
}
If you build the project first with only the V1.sqm
file in the sqldelight
folder, and then with both V1.sqm
and V2.sqm
, you’ll notice that the Person
class gets an additional year: Long?
field. This corresponds to the additional field in the ALTER TABLE
command.
Flyway comes in different packagings, but since we’re already using Gradle for our Kotlin + SQLDelight project, we can also add the Flyway plug-in there.
plugins {
kotlin("jvm") version "$kotlinVersion" // or multiplatform
// maybe others like serialization
id("app.cash.sqldelight") version "$sqlDelightVersion"
id("org.flywaydb.flyway") version "$flywayVersion"
}
Usually, you only need to point Flyway to the migration files and it will do its magic. Alas, the migration files V1.sqm
and V2.sqm
cannot be read by Flyway because of the SQLDelight-isms we’ve mentioned above. Fortunately, the SQLDelight developers have thought of this scenario, and provide a Gradle command to generate base SQL files from .sqm
migrations. We’re going to configure the output directory, though, to appear as part of the generated code.
sqldelight {
database("Database") {
...
deriveSchemaFromMigrations = true
migrationOutputDirectory = file("$buildDir/generated/migrations")
}
}
If you now run ./gradlew generateMainDatabaseMigrations
, the migration files are verified, and then stripped down to bare SQL which Flyway can handle. The next step is telling Flyway that the given folder is the one to look for migrations, once again in the Gradle build file.
flyway {
locations = arrayOf("filesystem:$buildDir/generated/migrations")
}
We’re ready to execute some migrations! For the sake of conciseness, we’re going to apply the changes using SQLite, which only requires a file path where the information is persisted, but almost every database on Earth is actually supported. In this simple case, we kindly ask Gradle to execute the flywayMigrate
task on the given URL, and ask for additional logs with the -i
option.
gradle flywayMigrate -Dflyway.url=jdbc:sqlite:file.db -i
The outcome explains that a new schema is created and brought to version 2.
Creating Schema History table "main"."flyway_schema_history" ...
Current version of schema "main": << Empty Schema >>
Migrating schema "main" to version "1"
Migrating schema "main" to version "2"
Successfully applied 2 migrations to schema "main", now at version v2 (execution time 00:00.005s)
You can try to execute the same command again, but then no changes are required, so no migration is performed.
Current version of schema "main": 2
Schema "main" is up to date. No migration necessary.
Your project is now set up for evolving schemas. Any additional changes go into subsequent V3.sqm
, V4.sqm
, and so on. In most cases, the queries and operations in the .sq
file don’t need changes; if they do, this is a good alert of possible breaking changes in your schema. For example, if we’ve marked the year
column as NOT NULL
, the newPersonInTown
operation would no longer be correct, because our definition specifies no value for that column.
We’re great fans of Kotlin at Xebia Functional, formerly 47 Degrees, exploring the many possibilities it brings to the back-end scene. We’re proud maintainers of Arrow, a set of companion libraries to Kotlin’s standard library, coroutines, and compiler; and provide Kotlin training to become an expert Kotliner. If you’re interested in talking to us, you can use our contact form, or join us on the Kotlin Slack.
]]>In the second part of the post, we’ll look at some web UIs that provide a complete set of features, like data visualization, topics administration, etc.
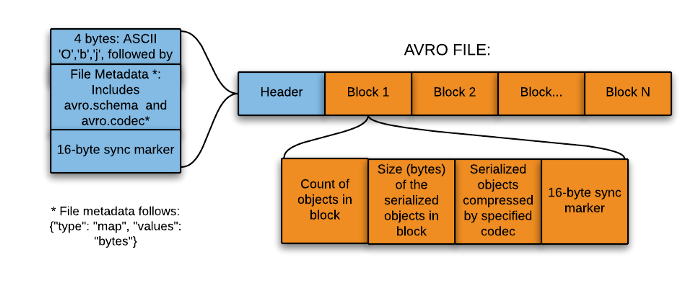
First, we need to pay attention to how we are serializing the data in Kafka, whether it is using vanilla Avro, Json, Confluent Avro, Protobuf, or just binary format.
For example, focusing on Avro, the main difference between Confluent Avro and vanilla Avro is whether it expects the schema id in the Avro payload. In Confluent Avro, a schema id is always needed at the start of the payload.
Using the Kafka CLI commands, we will be able to list the different topics available on our cluster and consumer the events.
If we work in an environment with docker containers, we can find them inside the container in the bin/
folder.
This CLI script allows us to list, create, and describe the topics available on our cluster.
$ bin/kafka-topics.sh --create --topic topicName --bootstrap-server broker:9092
$ bin/kafka-topics.sh --describe --topic topicName --bootstrap-server broker:9092
$ bin/kafka-topics.sh --list --bootstrap-server broker:9092
This regular console consumer doesn’t care about the format of the data; it’ll just print UTF8 encoded bytes. This means you will need to use other consumers in case you are serializing the data using confluent Avro.
Notice that we are using --from-beginning
and the --property
flags to print the key and consume the events
that are stored in the topic.
$ bin/kafka-console-consumer.sh \
--topic topicName \
--bootstrap-server broker:9092 \
--from-beginning \
--property print.key=true \
--property key.separator="-"
key1-value
key2-value
key3-value
You’ll use this command to read events serialized in Confluent Avro. You have to include the Schema Registry URL along with the command.
The Avro consumer expects the schema id in the event payload, getting an Unknown magic byte!
error if not specified.
Notice that, in Kafka, we can serialize the key and the value of the event in different ways. In this example, we serialized the key using the common String
serializer, and the value is serialized using confluent Avro.
This script is distributed with the Confluent Schema Registry docker images.
$ bin/kafka-avro-console-consumer \
--topic topicName \
--bootstrap-server broker:9092 \
--from-beginning
--property schema.registry.url=http://registry:8081 \
--property key.deserializer=org.apache.kafka.common.serialization.StringDeserializer \
--property print.key=true \
--property key.separator="-"
key1-{"key": "key1", value: "value"}
key2-{"key": "key2", value: "value"}
key3-{"key": "key3", value: "value"}
Kafkacat is the most versatile CLI client, allowing us to consume, produce, and list metadata from/to different topics.
We can consume (-C
) the events based on a number of events (-c
) or the offset or timestamp (-o
). By default, Kafkacat will consume all the events stored on the topic.
# Consuming 10 events
$ kcat -C -b broker:9092 -t topicName -c 10
# Consuming from offset 10
$ kcat -C -b broker:9092 -t topicName -o 10
# Consuming events between 2 timestamp
$ kcat -C -b broker:9092 -t topicName -o s@1568276612443 -o e@1568276617901
We can even format the output (-f
) and print different information as part of the output.
$ kcat -C -b localhost:9092 -t topic1 \
-f 'topic: %t, Key: %k, message value: %s, offset: %o, partition: %p timestamp: %T, headers: %h, key length: %K, value length: %S \n'
topic: topic1, Key: key1, message value: {"key": "key1", value: "value"}, offset: 0, partition: 0 timestamp: 1568276612443 , headers: , key length: 3, value length: 32
topic: topic1, Key: key2, message value: {"key": "key2", value: "value"}, offset: 1, partition: 0 timestamp: 1568276612443 , headers: , key length: 3, value length: 32
topic: topic1, Key: key3, message value: {"key": "key3", value: "value"}, offset: 1, partition: 0 timestamp: 1568276612443 , headers: , key length: 3, value length: 32
In order to choose the decoders, we have to use the -s
flag
# Decode key as 32-bit signed integer and value as 16-bit
$ kcat -b broker:9092 -t topicName -s key='i$' -s value='hB s'
# Decode key and value as avro
$ kcat -b broker:9092 -t topicName -s avro
We can run the kafkacat docker images in case we are working on a container environment with the following command:
docker run --tty \
--network docker-compose_default \
confluentinc/cp-kafkacat \
kcat -C -b broker:9092 -t topicName -o 10
In case we are working on a Kubernetes cluster, we can deploy a kafkacat image and consume the events by jumping inside the pod
apiVersion: apps/v1
kind: Deployment
metadata:
annotations:
kompose.cmd: kompose convert
kompose.version: 1.22.0 (HEAD)
labels:
io.kompose.service: kafkacat
name: kafkacat
spec:
replicas: 1
selector:
matchLabels:
io.kompose.service: kafkacat
template:
metadata:
labels:
io.kompose.service: kafkacat
spec:
containers:
- command:
- sleep
- "100000"
image: confluentinc/cp-kafkacat:latest
name: kafkacat
resources: {}
restartPolicy: Always
status: {}
Kafdrop is an open source web UI for viewing Kafka topics and browsing consumer groups. The tool displays information such as brokers, topics, partitions, and consumers, and lets you view messages. It has support for Docker and Kubernetes, so it is a good option if you are working on container environments.
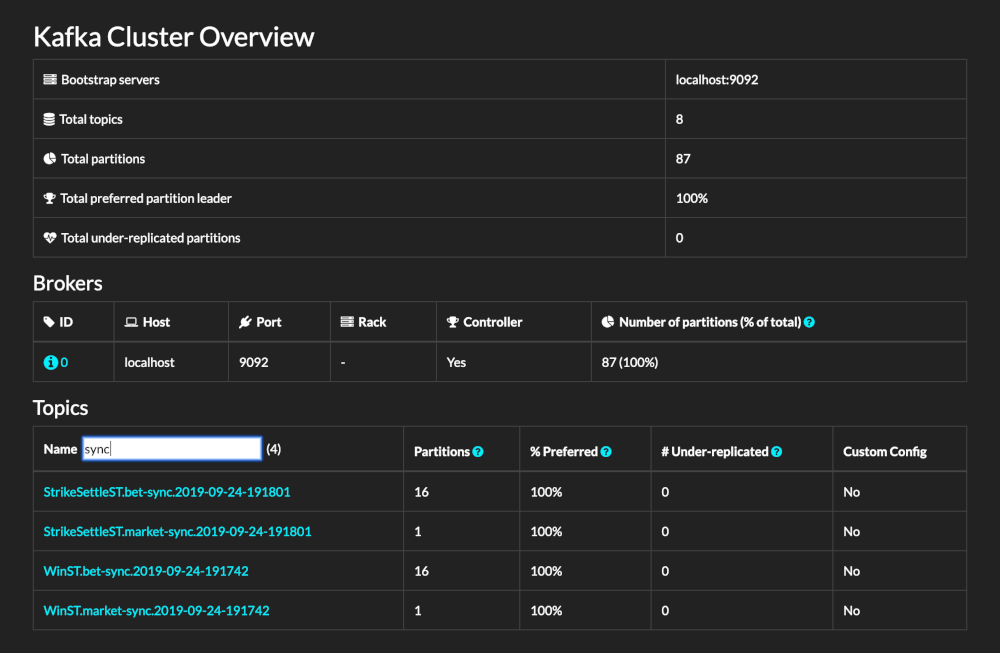
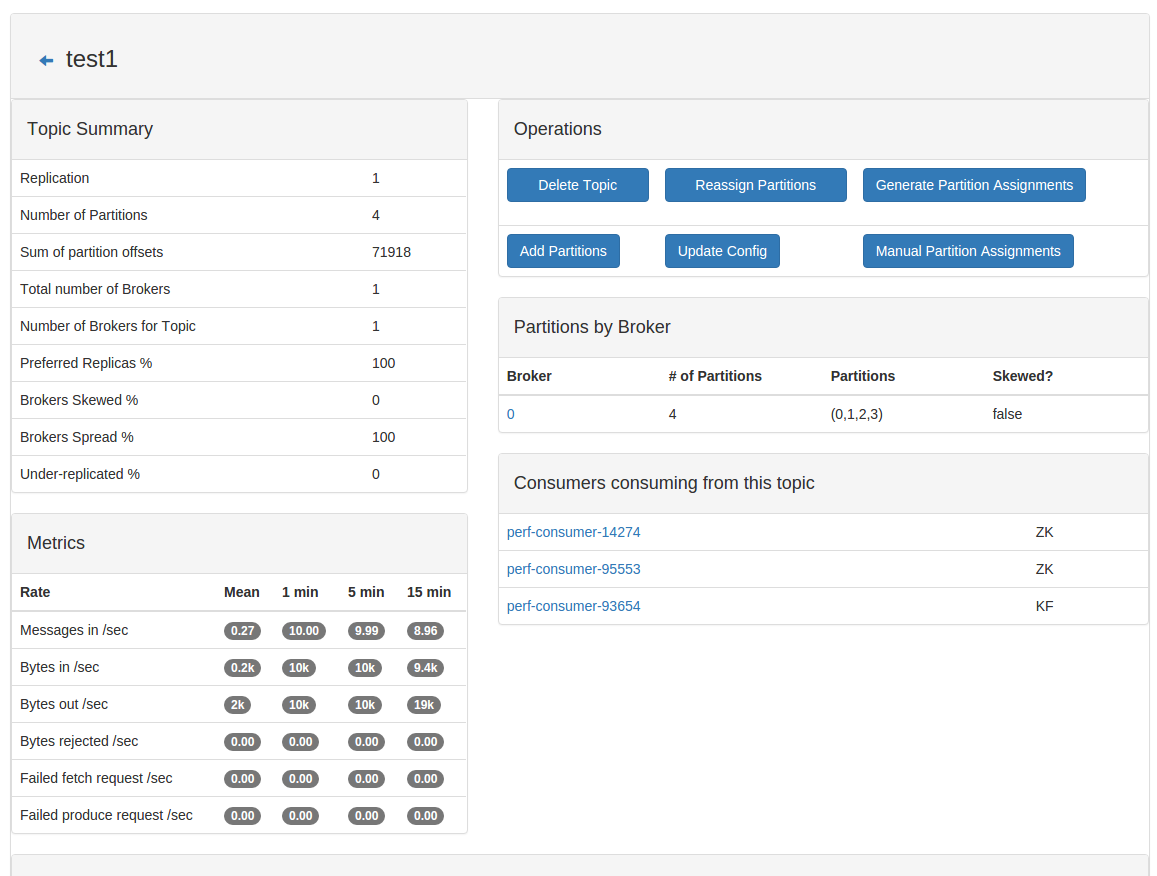
CMAK is a cluster manager for Apache Kafka, allowing us to manage multiple clusters and inspect the different topics, messages, and applications that are running inside our cluster and configure the replicas and the partition strategy on the different topics.
Control Center is another cluster manager for Apache Kafka developed by Confluent. It is similar to CMAK, but includes more features related to Kafka Connectors, alerts, and KsqlDB.
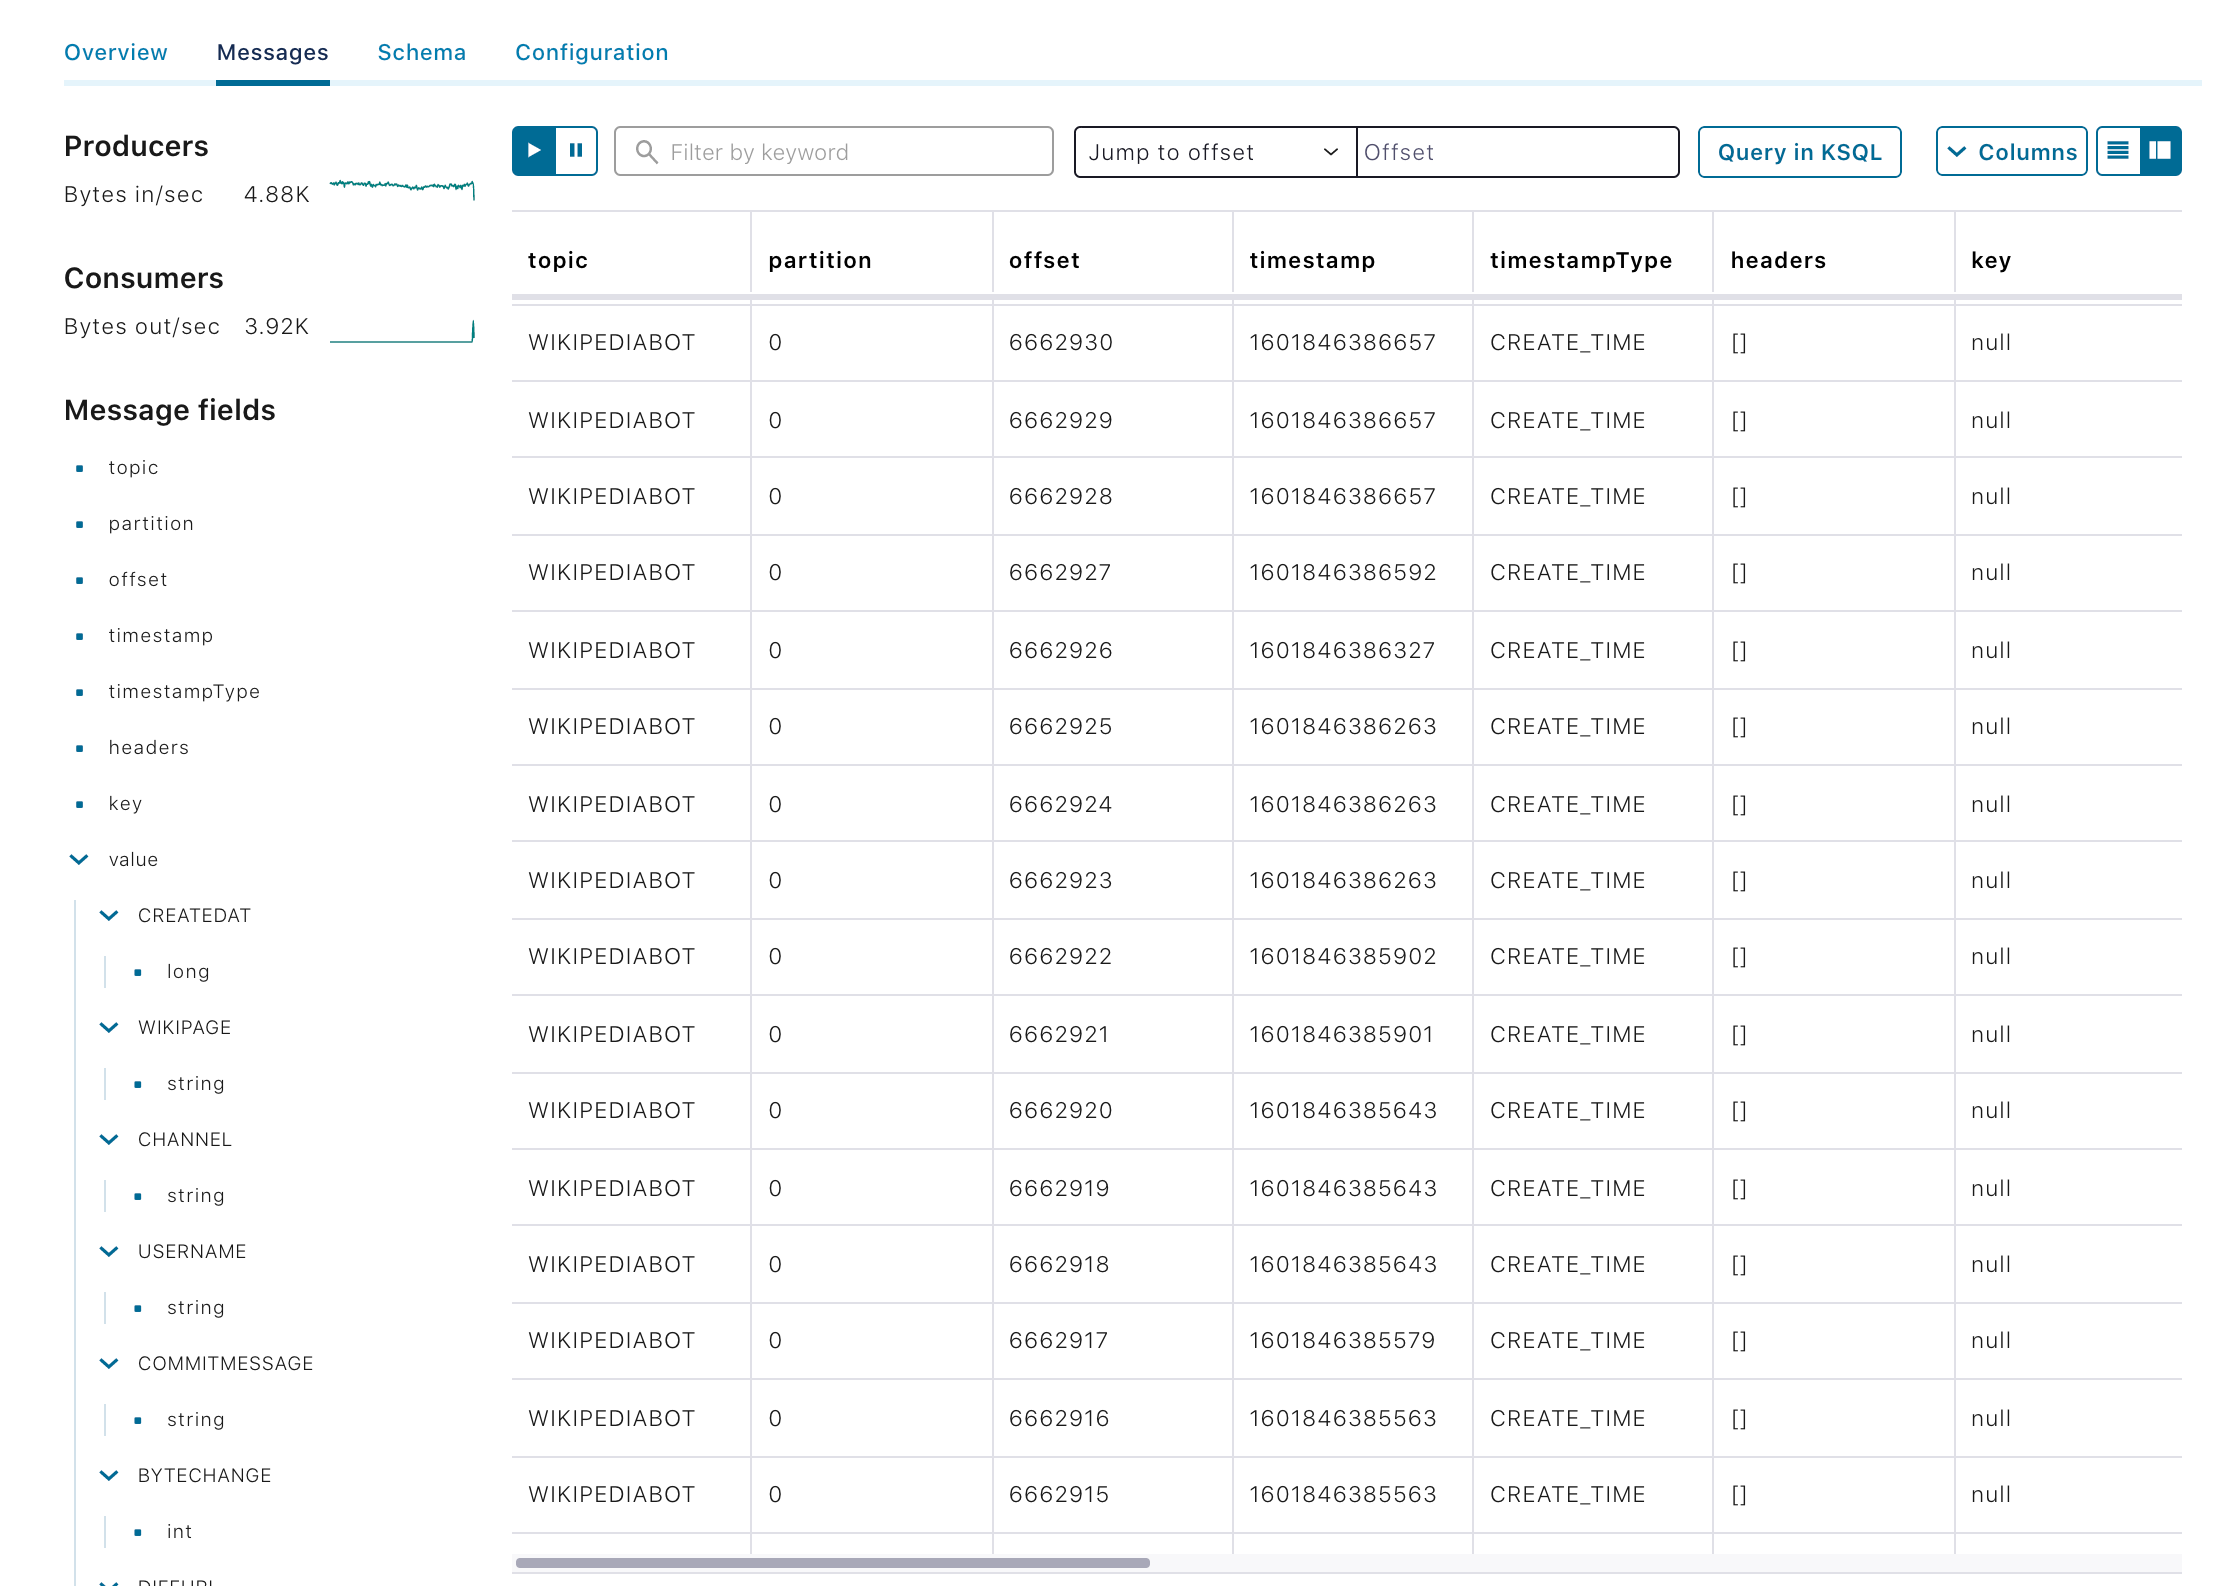
Redpanda Console (previously known as Kowl) is a web application that helps you manage and debug your Kafka/Redpanda workloads effortlessly.
We hope you find these tips and tools helpful in debugging your Kafka projects. Stay tuned for more content on Kafka from the Xebia Functional (formerly 47 Degrees) team!
]]>Kotlin lies in a really interesting intersection of programming styles, with functional programming becoming increasingly popular. Data classes, a collection library based on higher-order functions, and the suspend mechanism are examples of how Kotlin embraces the functional style. Libraries like Arrow have taken the lead on the community side. Others like HTTP4k talk of “your server as a function.” But functional programming is by no means new; languages like Haskell and OCaml have existed for more than three decades. So, why not take advantage of the decades worth of ideas, concepts, and patterns from the broader community? Functional Programming Ideas for the Curious Kotliner explores those ideas with a higher impact on Kotlin code, including how to model and transform data in immutable fashion, describing dependencies using contexts and effects, or treating actions as data.
The author is still putting the final touches on this book, but you can pick up an early-access version of Functional Programming Ideas for the Curious Kotliner at Leanpub.com. Although this is an in-progress release, you’ll get free updates when the author updates the book.
Alejandro is a developer and trainer specialized in functional programming. He has more than a decade of experience using and researching functional programming, formal verification, and static analysis. He holds a PhD from Utrecht University on the topic of compilers for domain-specific languages. He is the author of Practical Haskell, the Book of Monads, Haskell (Almost) Standard Libraries, and Functional Programming Ideas for the Curious Kotliner.
]]>